Custom Fields
How do I create a custom field?
How do I make custom fields appear on my invoices or
quotes?
How do I create a custom field?
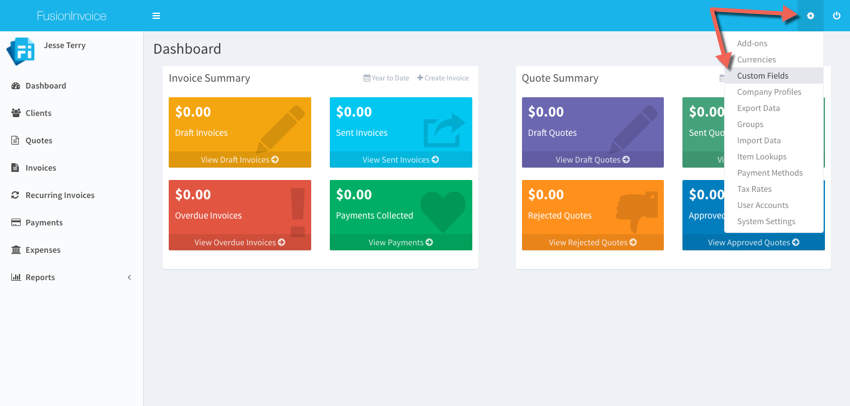
Click the System menu and select Custom Fields.

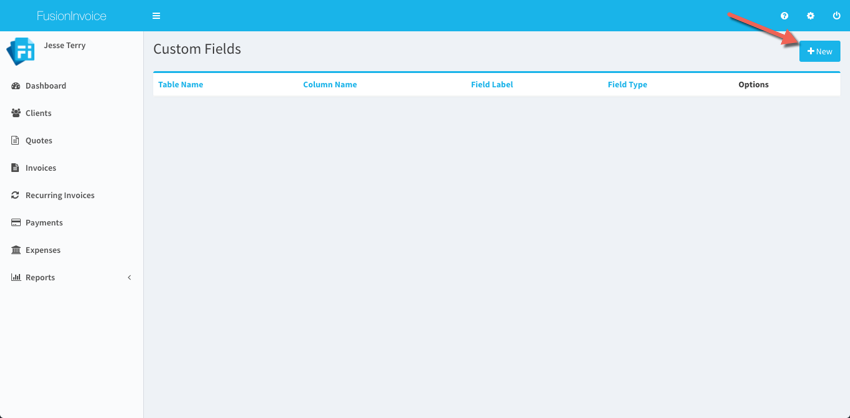
Press the New button.

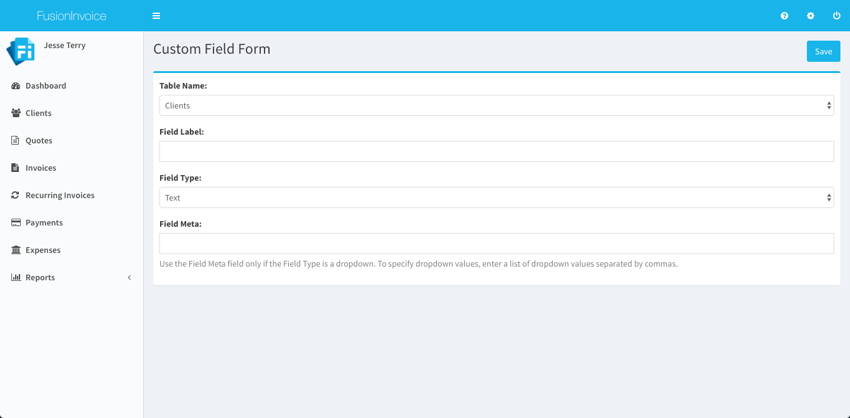
Use the Table Name field to choose the table to add the custom field to.
Enter the label of the custom field in Field Label.
Choose the type of the custom field in Field Type.
*Versions 2019-3 and Newer
-
Custom Fields are segregated by their associated table, within separate tabs at the top of the page.
You can sort the display order of the fields by dragging and dropping a field's row into the proper
location.
Tip: If you make a mistake in changing the Field Meta JSON value, you can reset it by selecting a
different field type (like Text), then reselecting the original field type you were working with.
- Custom Field Types and Uses
- Text: A regular text field, allowing for a max of 255 characters.
- Dropdown: Displays a list of possible values and allows a single choice from the list. The list is
defined as JSON text within the the Field Meta.
- Textarea: A large area of text, perfect for detailed notes. You can specify the number of rows
displayed by changing the default in the Field Meta JSON entry.
- Checkbox: Displays a graphical check box to signify a single yes or no answer.
- Radio: Similar to a Dropdown, but this control displays all of your options on screen, without
having to expand a list. It allows for a single item to be selected.
- Date: A simple date entry control. The format can be editing within the JSON text.
- Integer: Allows entry of whole numbers.
- URL: A website address. When the page displayed is in View mode, clicking the link will navigate to
the address.
- Email: An email address. When the page displayed is in View mode, clicking the link will navigate to
your default email client and begin a new email.
- Phone: A field for phone number entry. The format is your choice.
- Tag Selection: Allows you to define a list of selectable text "tags" to choose from, allowing you to
select multiple values. It should be noted that Tag Selection within Custom Fields does not allow
for ad-hoc tag creation at the time of data entry. Tags must be predefined within the Custom Field
JSON definition.
- DateTime: A simple date time control with an editable format.
- Currency: A basic currency field, allowing you to define the currency symbol.
- Decimal: Similar to Integer, but allows for values after the decimal point.
- Image: Allows for the selection and display of an image (JPG, PNG, etc.)
*Versions 2019-2 and Prior
If the Field Type is a dropdown, enter the list of dropdown values separated by commas in Field Meta. For
example, if the Field Label is Color and
the Field Type is dropdown, you might enter: White,Blue,Red,Green,Orange,Purple,Black. If the Field type is
not dropdown, leave Field Meta empty.
Press the Save button. Your custom field(s) will now appear on the appropriate edit screens.

How do I make custom fields appear on my invoices or quotes?
See this
section in the Invoice Templates documentation.


